Cool Tool(s) of the
Month |
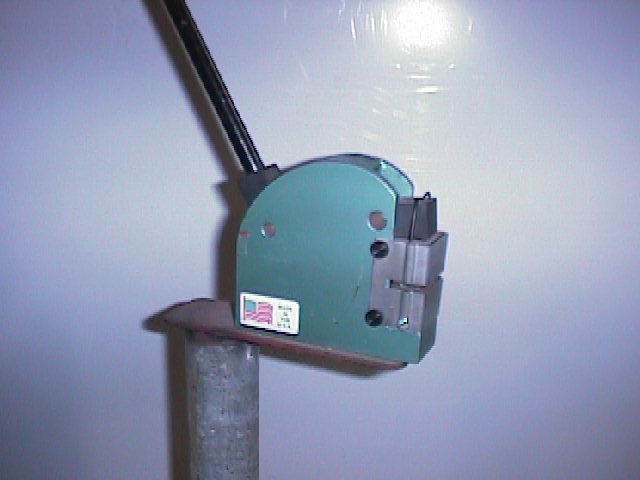
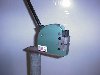
| Basic: Hand Punch – This tool comes with different size die sets to punch holes
in sheetmetal. I almost exclusively use the 1/8-inch dies. It’s incredibly handy for
punching holes in the aluminum sheet for using clecos to temporarily hold your panels
together. It also does not require any deburring like drilling does. You will have to
practice a bit to be able to hit your mark dead center. The good thing however is that
it’s got a point on the male die which you can use to "center-punch" the
spot, then pull back a bit and verify that you’re centered on the correct spot before
|
 |
| actually punching through.
The one I use is from Harbor Freight and was less than $20. I wasn’t sure it would be
that useful when I bought it, so I opted for the cheapo version, but I’ve been using
it for about 4 years now with no problems at all. The Harbor Freight one is a copy of the
original Roper Whitney hand punch that sells for about $65. |
|
|
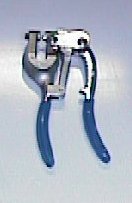
| Advanced: Shrinker/Stretcher – This tool is used to draw or stretch metal along an edge.
It is very useful for making curved pieces, such as wheel tubs. You can take a large flat
piece of aluminum, say |
 |
| 12x48-inches, put a �-inch
wide brake down one of the long edges, and use the shrinker along that �-inch lip to draw
the piece into a large curve. Now you have the "top" of your wheel tubs and have
a flange all the way down the inside edge to rivet, bolt, or weld your side to. The dies
are interchangeable on this tool to make it stretch the metal rather than shrink it. I
used this tool extensively while making Eric Ellis’ roof tunnel, to make the curves
around the rear window. (See that work here.) The tool does leave
tooth marks in the metal as it grabs the metal and pulls or squeezes. Less expensive
options for making curved flanges are wooden hammerforms or cutting slits in the flange to
allow it to spread. I got my Porto shrinker/stretcher combo from Aircraft Spruce &
Specialty and paid about $200. It came with one body and two sets of interchangeable dies.
I built a stand for it to make it mobile so I could get it out in the open for working
with large pieces like wheel tubs. |
|
|
Big Wig Music
Selections of the Month |
Please
remember - I wrote this in 1999. Still a good CD though!
A critical item in the shop has to be the stereo.
If you’re like me, spending so much time in the shop you get tired of listening to
the same stuff on the radio all the time. So, I occasionally listen to CD’s while I
work, and here are my current favorites that you would find in the player if you came by
the BWRC shop:
Lenny Kravitz -
"5" - Cool, funky rock. |
|
Tips and
Tricks for Making
Aluminum Panels |
- First, as stated in earlier Tips, I do all my
aluminum forming with the PVC sheet still on the panel so it does not cause any
scratching.
- I use fine point Sharpies for marking all my
beads. The entire bead pattern is drawn on the panel before any beads are started. I use a
circle template for all the corners and typically try to keep all the radii the same for
the whole car, if possible. Some areas simply look better with a larger or smaller radius,
so use your judgement here.
- For uniformity, try to make all the beads the
same distance from the edge of the panel. I often use the width of my ruler, which comes
out to be about 1.25-inches. That makes it easy on the straight edges.
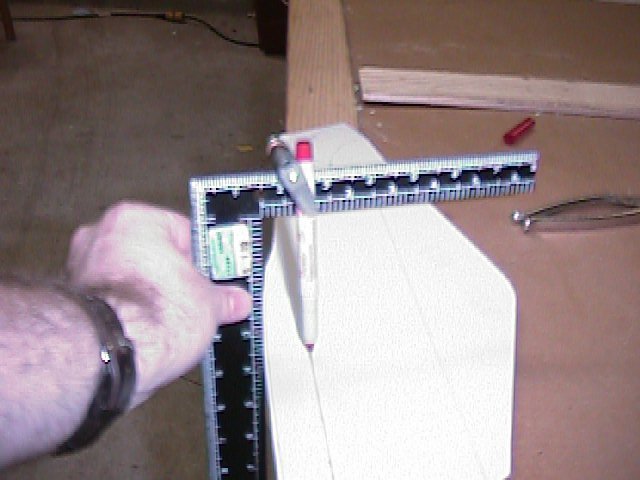
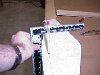
| - For curved edges, I clamp my Sharpie to a small
square at the desired distance in, and use that to trace the edge. (See picture. Sorry for
the blurry shot, but you'll get the idea) |
 |
- Start your bead in the least
visible area of the panel, if possible, because until you become a master bead roller,
you’ll be able to see where the bead stopped and started.
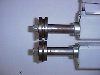
| - For more precise lines using a die-set such as the good old
half-round bead, put the male die on the bottom and use one of the sharper edges of the
female die as your reference to follow the drawn lines. (see picture) If you do this,
don’t forget that the rolled bead won’t be centered on the drawn line, so
you’ll need to compensate for that. |
 |
- On large panels that might exceed
the throat capacity of your bead roller, spread the dies and slide the panel through on a
pretend run, just so you’re not surprised in the middle of putting the real beads
into a panel and have to stop in the middle of a curve because you run out of room.
- In most cases, you’ll need to roll the
beads before putting any brakes in the panel. Otherwise, it won’t fit through the
bead roller throat.
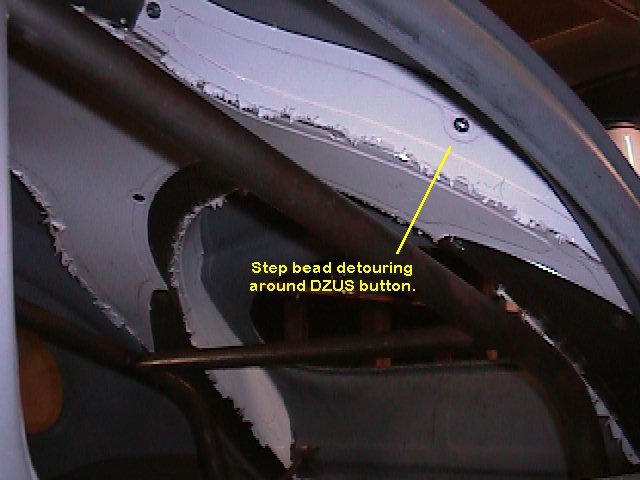
| - Make sure you know where
your DZUS buttons will go before rolling beads near the edge, and plan for that if
possible. (See picture) Otherwise, you’ll squash the bead when you use your
countersink tool. Besides, I think it looks |
 |
| cool to detour around a
DZUS button – to me it shows that you put some forethought into the panel, rather
than doing all the bead work first and then putting in the DZUS buttons last. - Don’t make any abrupt changes in
direction if you get off your path on a long straight line, or you’ll see it in the
final product. Slowly and gradually get back on your line, or adjust for it at the next
corner. Wavey beads look incredibly sloppy.
- When marking for step beads, indicate
"up" or "down" on the appropriate side of the bead to avoid confusion
when you get over to the bead roller. It’s easy to get screwed up here, especially if
you’re putting decorative beads into a panel and also putting step downs along an
edge for an overlap. Typically, you’re stepping up in one area and down in another,
so it’s not hard to make a mistake that ruins the entire panel.
Coming in future newsletters – a
pictorial on making a panel from start to finish.
Send me a message if there's something specific
you're interested in.
|
|
|